Getting the perfect shot in a photo booth isn’t about placing a camera and clicking away—it’s about adjusting camera settings to match the environment..
Without the right camera settings, you risk blurry, poorly lit, or unfocused photos, leading to an underwhelming experience for your guests.
From tweaking the camera lens settings for sharpness to adjusting ISO for ideal lighting, mastering camera settings for photography is crucial to making your photo booth shots shine.
In this blog, we’ll explore the best camera settings for the perfect photobooth, ensuring every shot is well-lit, sharp, and professional, no matter the event or setup.
Elevate Your Brand Presence
GC Event Studio’s Brand Activation Photography captures the essence of your corporate events with striking visuals. Our expert photographers ensure every moment showcases your brand’s energy and impact, leaving a lasting impression on your audience.

What Are the Essential Camera Settings for Photo Booth to Know?
When setting up a photo booth, having the right digital camera settings is key to getting sharp, well-lit images.
These settings control how your camera handles light, focus, and movement, ensuring clear pictures that look great in any situation.
But before we dive into specific settings, it’s important to understand a few basic principles.
This understanding will help you adjust the settings more effectively. So, what are the best camera settings you should be familiar with?
Let’s explore.
1. Aperture
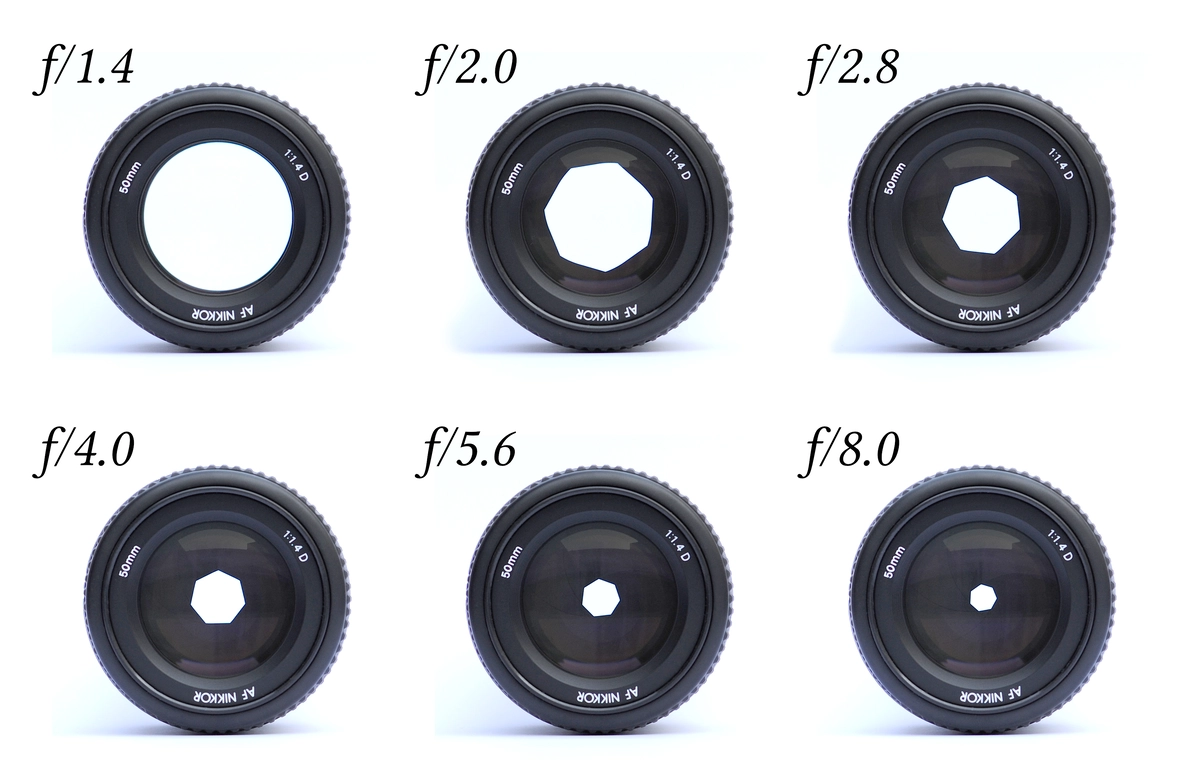
Aperture is the opening in the camera lens that controls how much light reaches the sensor.
It’s measured in f-stops.
Smaller numbers like f/1.4 mean the opening is wider, letting in more light.
Bigger numbers like f/16 mean the opening is smaller, letting in less light.
Additionally, aperture affects how much of the picture remains in focus.
A wide aperture (large opening) focuses on the subject and blurs the background, making it ideal for individual shots in your photobooth setup.
A narrow aperture (small opening) keeps more of the entire scene sharp and in focus.
When adjusting aperture in your best camera settings for a photo booth, a balanced aperture ensures the right amount of light enters the lens.
2. Shutter Speed
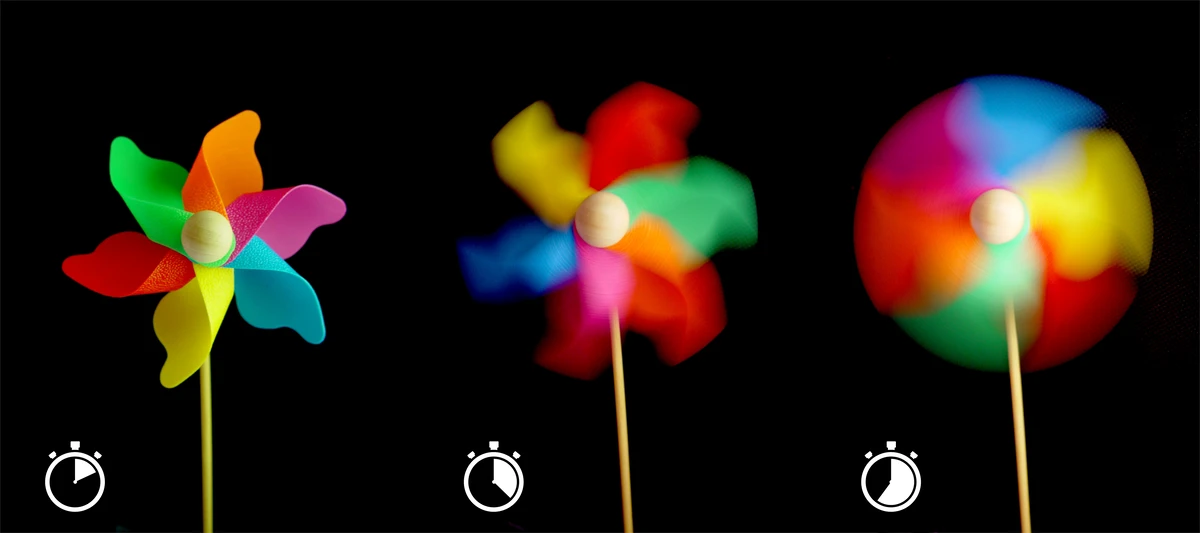
Shutter speed is how long the camera stays open to let light in.
A fast shutter speed captures sharp pictures, perfect for quick action, like dogs running.
A slow shutter speed keeps the shutter open longer, which helps in low light or when you want to show motion, like car lights on a highway.
Adjusting shutter speed comes with challenges, as slower speeds can lead to blurry images if the subject or camera moves.
Balancing light and motion is key to using shutter speed effectively in various settings.
3. ISO

ISO is one of the three key settings in photography basics. It works together with shutter speed and aperture to control exposure. ISO affects how much light the camera sensor captures overall.
This influences how bright or dark the image appears.
Photographers adjust ISO for both technical and creative purposes in photography.
Originally, ISO described film sensitivity to light, set by standards.
In digital cameras, ISO still measures light sensitivity the same way today.
The system ensures consistent exposure across all digital images.
4. White Balance
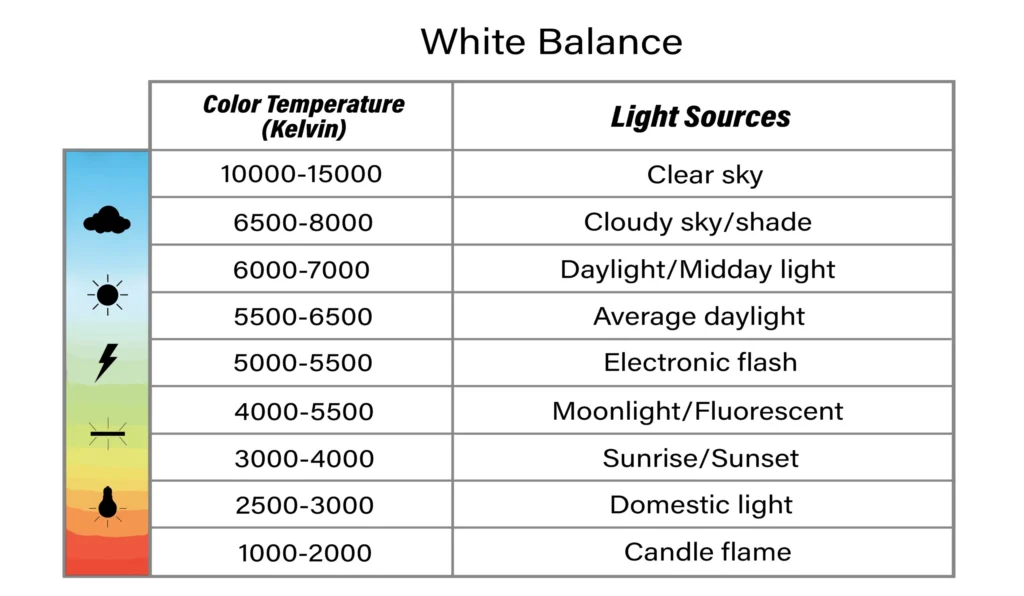
Image courtesy of Camera Harmony
White balance is a camera setting that adjusts the colors in your photos to match the color temperature of the light in the scene.
It ensures that whites appear truly white and that other colors look natural.
Different lighting conditions, like daylight, tungsten, or fluorescent, affect color balance.
These conditions can make photos appear too warm or cool.
Adjusting white balance helps correct these shifts for accurate colors.
Proper white balance ensures true-to-life colors in various lighting environments.
5: Frames Per Second (FPS)
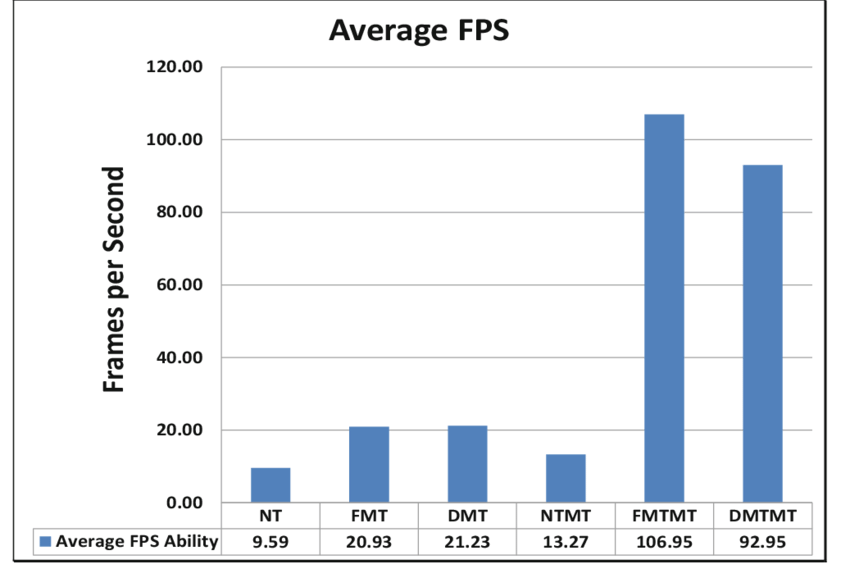
Frames per second (FPS) refers to how many frames are captured each second.
It is important during video or motion-based photography in photo booths.
In booths, FPS affects the smoothness of motion, especially in videos. Higher FPS provides fluid movement, particularly for action sequences.
Here are some common FPS settings and their applications:
- 30 FPS: Delivers smooth, natural motion, ideal for standard video capture in photo booths.
- 60 FPS: Offers even smoother motion, great for events with fast-moving subjects and more dynamic scenes.
- 120/240 FPS: Perfect for slow-motion video capture, allowing for smooth, detailed slow-motion effects without choppy results.
Selecting the right FPS setting helps balance the smoothness of motion and the clarity of the final output based on the booth’s needs.
Best Camera Settings for Photo Booth Shots
NOTE: These camera settings are fundamental and work with all camera types. They apply to every camera brand, including Nikon, Canon, or others. These photobooth camera settings are crucial for controlling exposure in every shot. Using them ensures high-quality photos in any shooting environment.
Capturing excellent photo booth shots depends on setting up your camera correctly.
Adjusting settings like aperture, shutter speed, ISO, and white balance is important. These elements work together to achieve sharp, well-exposed photos consistently.
Proper adjustments ensure good results in any lighting or environment. Fine-tuning each setting helps capture high-quality images.
Below are the essential camera settings you need to know for consistently excellent photo booth results.
1. Aperture

For indoor photo booths, a wider aperture around f/4 to f/5.6 works well to allow more light, which is helpful in low-light situations.
This aperture range gives a balanced depth of field for photos.
It keeps subjects in focus without too much background blur. This setting works well for group shots, ensuring clarity throughout.
In outdoor photo booths, where lighting is usually brighter, a narrower aperture like f/7 to f/11 is more suitable.
This helps control bright natural light and maintain better focus.
It keeps more of the scene sharp, which is great for group photos. Larger group shots benefit from this as well as detailed backgrounds.
2. Shutter Speed

After setting your aperture, selecting the right shutter speed is crucial.
It helps in capturing sharp and clear photo booth images.
Proper shutter speed ensures no motion blur in fast scenes.
Balancing aperture and speed guarantees perfect shots every time.
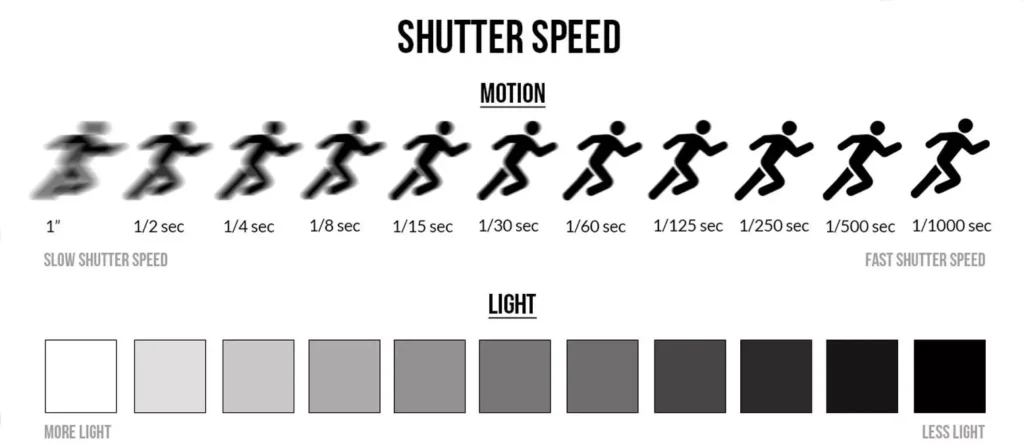
For indoor photo booths, use a shutter speed of 1/100 to 1/200 to prevent motion blur and compensate for low lighting.
This ensures subjects are crisp, even if there’s some movement.
For outdoor photo booths, where natural light is more abundant, a faster shutter speed like 1/200 to 1/250 works well.
This setting will freeze movement while balancing the available light to avoid overexposure.
3. ISO

The right ISO is crucial for achieving optimal exposure in various lighting conditions.
For the best camera settings, here are general guidelines to help you choose the appropriate sensitivity level for your DSLR or mirrorless camera’s sensor:

Image courtesy of Katy Kahla Photography
- ISO 100: Best for shooting outdoors in bright sunlight, producing clear images. It minimizes noise in the brightest settings, ensuring high image quality.
- ISO 200: A common setting for well-lit scenes with balanced lighting. It strikes a good balance between image brightness and maintaining quality without noise.
- ISO 400: Works well in moderate lighting, such as near windows indoors or on overcast days. It balances light while maintaining sharpness.
- ISO 800: Best suited for indoor shoots without added lighting. It enhances brightness when flash isn’t available.
- ISO 1600: Necessary for low-light situations, whether indoors or at night. Pairing it with a fast shutter speed helps capture motion without sacrificing exposure and avoid noise.
When working on how to set camera settings, always adjust ISO according to the available light. The goal is to balance sensitivity while maintaining image quality.
| Pro Tip: If the room is dark, ISO settings should be set to the maximum, and aperture settings should be minimum. In bright conditions, the opposite applies: ISO will be set to the minimum, and aperture settings will be higher than usual.
4. White Balance
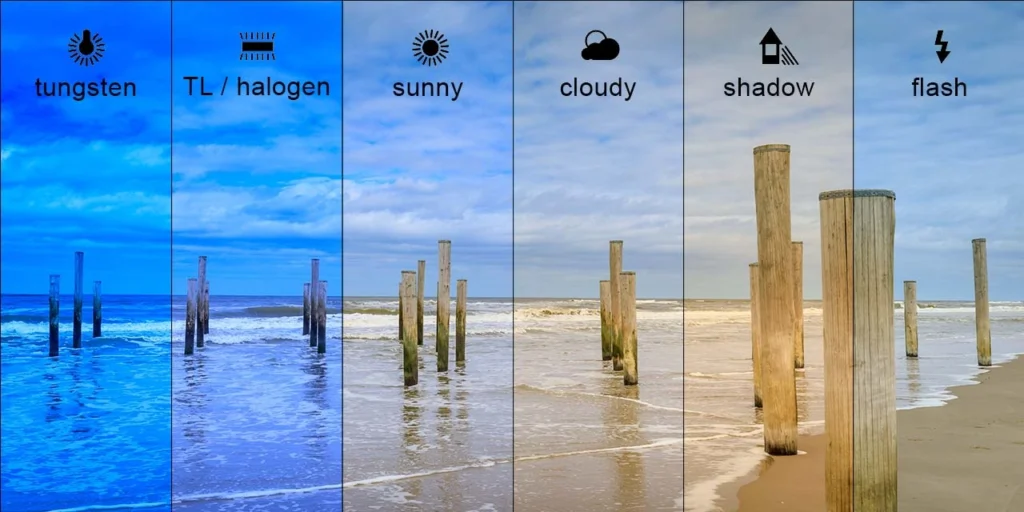
White balance ensures that colors in your photo booth images are accurate.
It adjusts for different lighting conditions to keep colors looking natural.
It fixes color shifts from various light sources, keeping whites and other colors true.
For indoor photo booths, use presets like Tungsten or Fluorescent, depending on the lighting.
These settings help correct warm or cool tones, giving you balanced and natural images.
In outdoor booths, natural light varies, so using the Daylight or Cloudy presets is recommended.
These settings help to maintain color accuracy and prevent images from looking too warm or cool.
| Pro Tip: Most cameras have an auto white balance setting that can be effective in many situations.
5. Focus

Using manual focus is the most reliable option in a photo booth to ensure sharp, clear images.
Auto-focus may cause delays or focus on the wrong part of the scene, especially when lighting is tricky or multiple people are involved.
By manually setting the focus at a specific distance, sharpness is ensured.
Everyone in the frame remains focused, even with movement.
This method works well despite changes in lighting conditions.
Place the focus point about 4 to 6 feet from the camera for a typical setup.
This keeps individuals and small groups sharp, avoiding issues with auto-focus and struggling to find the right subject.
Manual focus also reduces time wasted on refocusing for each shot, keeping the process smooth and efficient.
6. Metering Modes
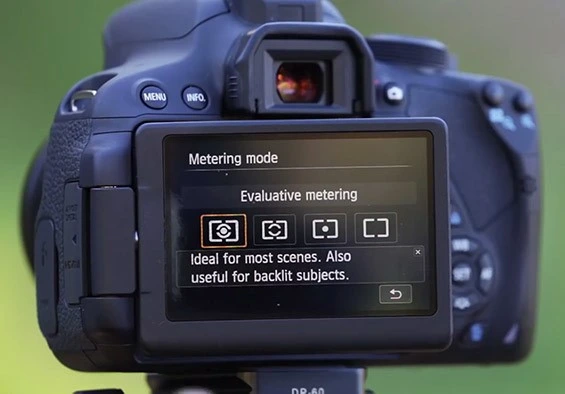
Metering modes are crucial for determining how your camera measures light in a scene, helping you achieve the correct exposure.
Here are the common metering modes and how they apply to photo booths:
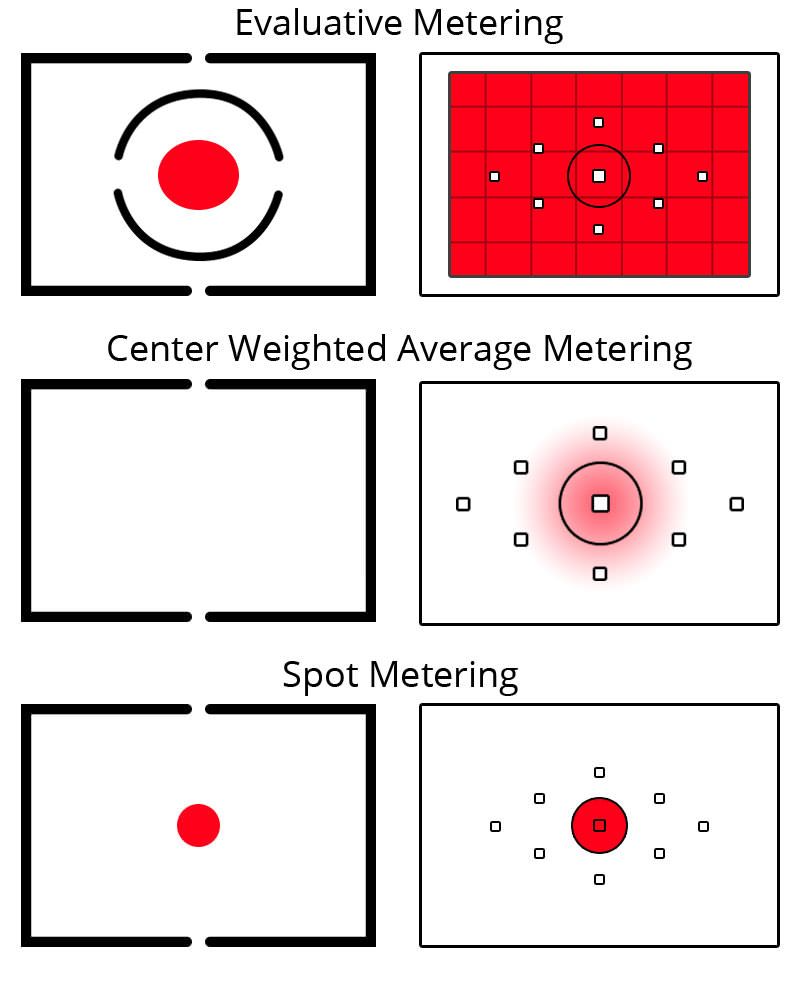
1. Evaluative/Matrix Metering:
This mode evaluates the entire scene to balance the light properly.
It is ideal for Glam Filter Booths, where even lighting is crucial for flawless images. By ensuring both the subject and background are evenly lit, it enhances the overall glamour effect.
This mode prevents any areas from being too dark or too bright. It’s especially important in glam booths, where achieving a polished, glowing look is key to the final image quality.
2. Center-Weighted Metering:
Prioritizes the central area of the camera’s frame. It is great for focusing on subjects placed in the center. This mode works well when the background is less important.
This is perfect for setups like the Red Carpet Booth, where individuals or small groups stand centrally. It’s useful for capturing individuals or small groups in photo booths, where the focus is mainly on the people in the middle of the frame.
3. Spot metering:
Spot metering focuses on measuring light in a small area of the frame, usually in the center or on the focus point. It’s ideal for situations with high contrast between the subject and background.
In setups like the Roamers Photo Booth, spot metering ensures the subject is properly exposed, even if the background is much brighter. This helps capture clear, well-balanced shots, especially in challenging lighting conditions.
7. Drive Mode
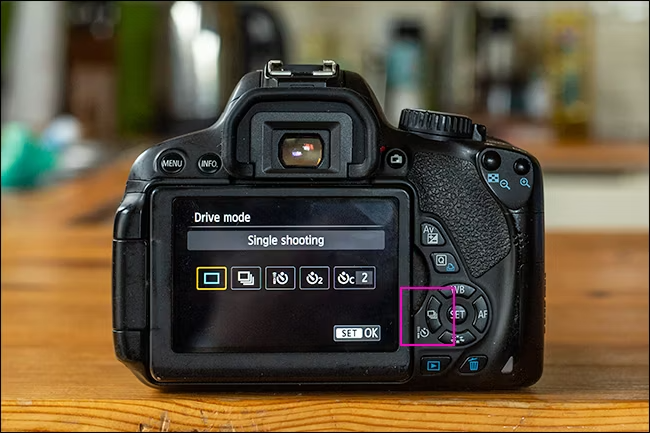
Drive mode determines how your camera takes photos when the shutter is pressed. There are several drive modes that can enhance your photo booth experience:
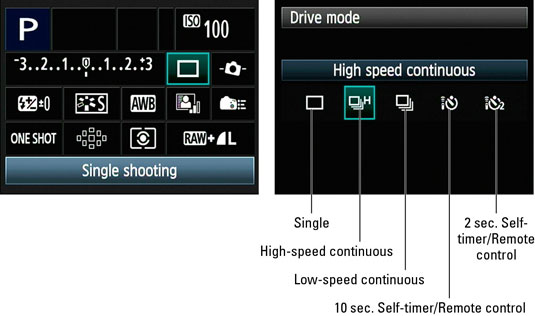
- Single-Shot Mode: This mode captures one photo each time the shutter button is pressed. It’s ideal for static subjects or situations where you want to ensure every shot is intentional. This is useful in booths where guests are posing, and you want individual, well-timed shots.
- Continuous mode lets the camera keep snapping photos while the shutter button is held. It’s ideal for capturing action or lively moments, like in photo booths where guests move or pose quickly. This mode ensures you won’t miss any important moments.
- Self-Timer Mode: Often set with a 2 or 10-second delay, self-timer mode gives guests enough time to prepare after pressing the button.
This is especially useful when the booth operates without an attendant, letting people get into position for the shot. - Remote Release Mode: This mode lets you take pictures without touching the camera by using a wireless remote. It helps prevent camera shake, so your shots stay clear and sharp.
8: Frames Per Second
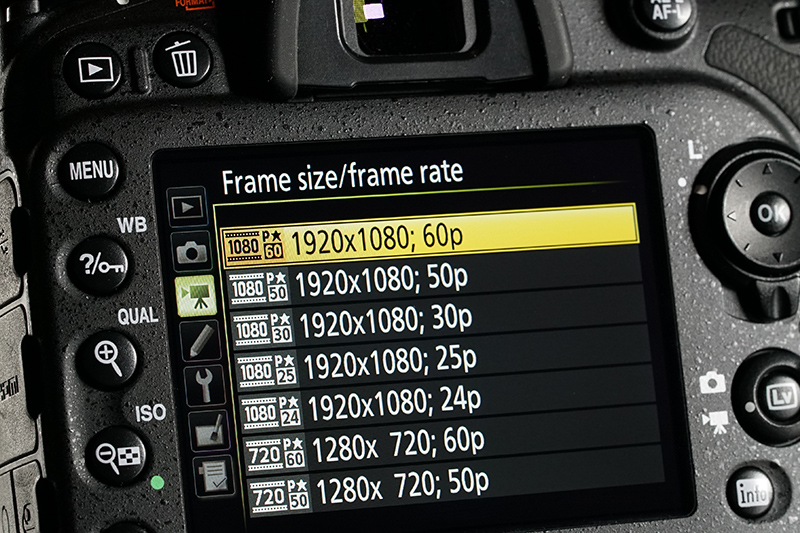
Frames per second (FPS) plays a crucial role in capturing smooth, high-quality motion in photo booths.
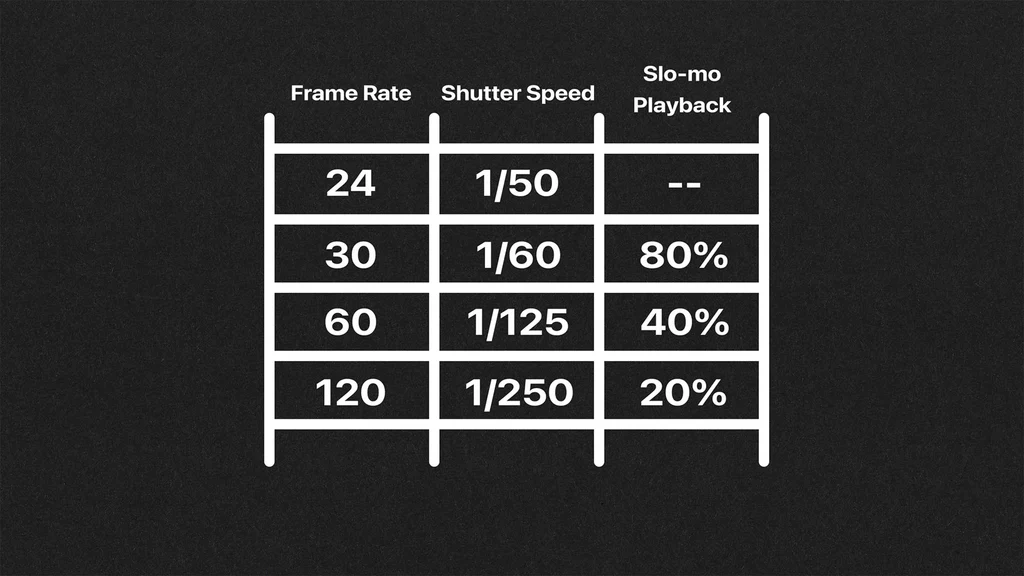
For specific setups like the 360 photo booth, a higher FPS is essential to capture fluid, dynamic movement from multiple angles.
In this case, 60 FPS or higher is ideal, ensuring every motion is crisp and seamless.
For slow-motion photo booths, a much higher FPS, like 240 FPS or more, is needed. This allows you to capture that dramatic, slowed-down effect while still keeping the image clear and sharp.
This allows the motion to be stretched out smoothly, making every frame appear sharp and engaging.
PREMIUM PHOTO BOOTH EXPERIENCES

The Bottom Line:
Your camera setting for your photo booth can make or break your event. You need to make sure they are tuned according to your settings.
For a flawless photo booth experience, GC Event Studios offers a diverse selection of photo booths, backed by our professional team of photographers and videographers who expertly manage all camera settings to ensure optimal results.
From Brand Activations to corporate events and social events, we have executed events flawlessly every time.
Contact Us today to enhance your next event with our professional team and top-tier photo and video booths.


